
Create and send an invoice
Create an invoice from a deal or the Invoices list, add items from your product list, send it with a Pay now link and correct it with a credit note.
Who can use this
OwnerCompany adminHRDepartment managerMemberRequirements
- CRM access (department, personal grant or channel)
Dromix invoices are linked to your deals and customers. Customers get the invoice as a PDF with a Pay now link, so they can pay online or by bank transfer.
Who can create invoices
By default, the Owner, Company admins and the deal owner can create and send invoices for a deal. Your company can limit this to Owners and admins only. In Invoices, everyone else sees the invoices of their own deals.
Create an invoice
- Open the deal and choose the Invoices tab, then select New invoice. Or open Invoices from the More menu (three dots) in the left rail and select New invoice.
- Under Bill to, check the Customer, the Email the invoice is sent to, the Address and the Customer tax ID.
- Under Details, check the Issue date, Currency, Payment terms and Due date.
- Under Items, add lines with Description, Qty, Unit price, Disc. % and tax, or select + Add from products to add products in the invoice currency.
- Add Notes if you like, for example payment instructions.
- Select Save draft, or Save & send to send it right away.
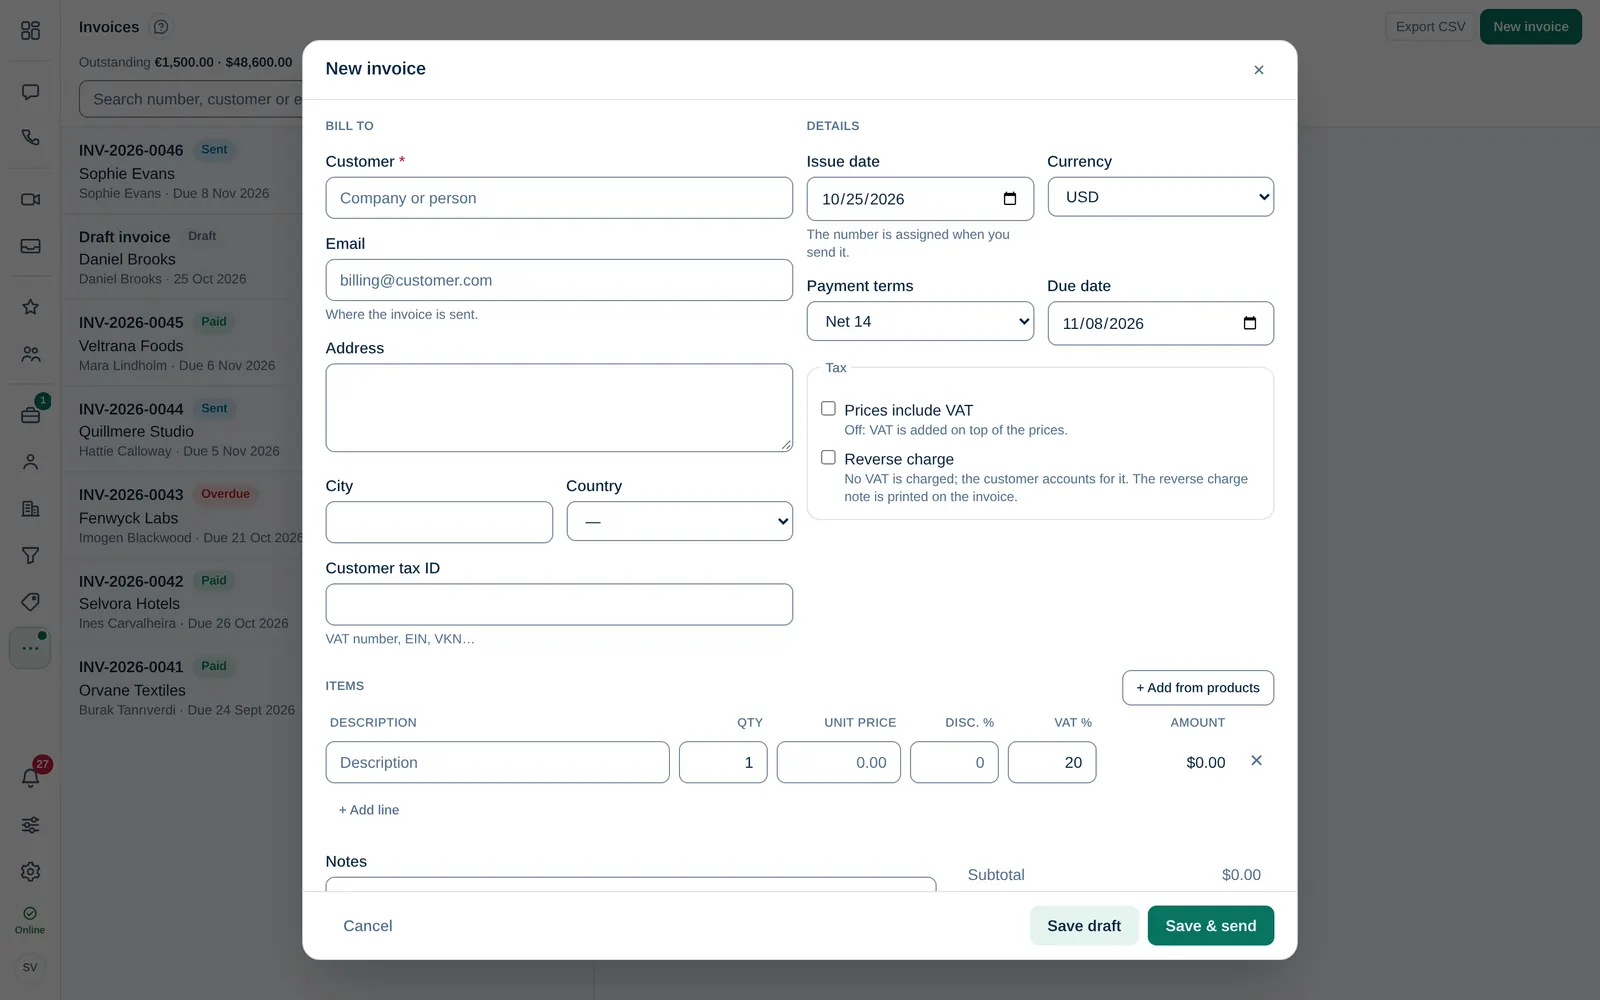
From a deal, the invoice is prefilled from the latest signed contract, else the latest accepted proposal: its lines, currency and tax setting. Without one it starts with the deal value. With the sales flow, Dromix creates the first invoice when the deal is won.
The invoice number is assigned when you send it, or mark it as sent, so there are no gaps. Drafts have no number and can be deleted.
Tax options
- Prices include tax: turn it off to add the tax on top of the prices.
- Reverse charge: no tax is charged and the reverse charge note is printed, for example for EU business customers in another country.
Send it
- Open the invoice and select Send.
- Choose From: one of your mailboxes or, when it is set up, System email. Check To, Cc, Subject and Message. Separate several addresses with commas.
- Select Send.
The PDF is attached and the Pay now link is added below your message. Without a connected mailbox or system email, select Mark as sent and share the PDF or Copy pay link yourself.
Deals in a brand pipeline. If the deal's pipeline belongs to a brand, the invoice always goes from that pipeline's sending inbox (its own inbox, else the brand's inbox), with the brand's name; From shows it and cannot be changed. If there is no sending inbox, the invoice cannot be emailed and the dialog says why. It is never sent from another address instead. Ask an admin to link the inbox, or use Mark as sent.
Brand on the invoice
An invoice for a deal in a brand pipeline shows the brand's name, logo, color, address, contact details and document footer, on the PDF and on the payment page. The legal name and tax ID stay the company's. New invoices of the brand's deals start with the brand's Default invoice notes when set, else the company's notes. Admins set these in Documents & public pages.
Follow the status
The status shows Draft, Sent, Viewed, Partially paid, Paid, Overdue or Void. Outstanding and Overdue at the top of Invoices show what customers still owe. Export CSV downloads the list.
Correct an invoice
A sent invoice cannot be edited. Instead:
- Credit note: reduces what the customer owes, in full (Full credit) or with a Partial amount (including tax). Give a Reason, for example Returned items, pricing correction, and select Issue credit note. It gets its own number.
- Void: for an invoice issued in error. It stays in your records with its number, marked Void, and the customer's pay link stops working. This cannot be undone.