
Set up pipelines and stages
Create sales pipelines, name and order their stages, set win probabilities, choose the default pipeline and automate each stage with rules.
Who can use this
OwnerCompany adminRequirements
None beyond the role
A pipelinePipeline The ordered list of stages a deal goes through, from first contact to Won or Lost. A company can have several pipelines, for example one per product line. is the path a dealDeal A sales opportunity with a value, an owner and a stage in a pipeline. Deals are what the Deals board, the forecast and the sales reports count. takes from first contact to won or lost. Each deal belongs to one pipeline, and you can move it to another later. You manage pipelines in Company admin → Sales & integrations → Pipelines.
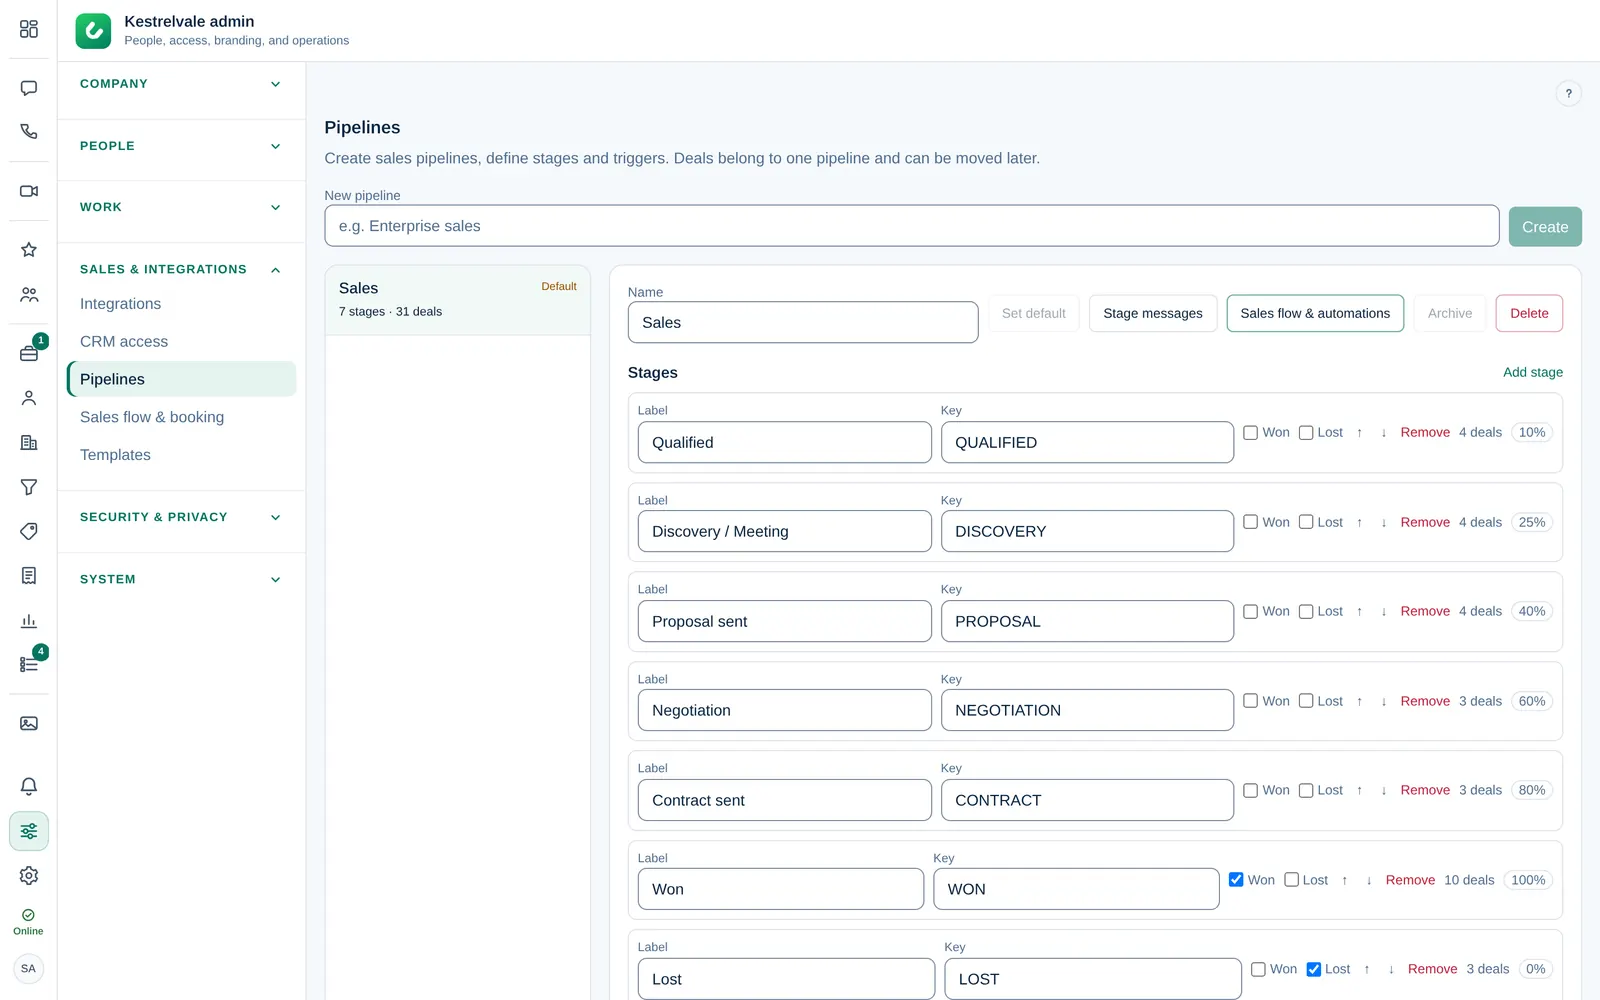
The pipelines page
It looks like the Pipelines step of the setup wizard. Each pipeline is a card, grouped by owner: your company (main brand) first, then each brand. A card shows the name, Default for the default pipeline, Test mode or Live, its stages, rules, messages and deals, and the inbox it sends from. When a pipeline has no sending inbox, the card says so, with a link to Inboxes & channels in the setup wizard.
Select a card to open the pipeline. Its tabs are Stages, Automations, Messages, Documents, Lost reasons, Lead sources & assignment and General (name, brand, sending inbox and documents & booking defaults). Go live and ⋯ (pipeline actions) are at the top, and Back to pipelines returns to the cards. Archived pipelines are in the collapsed Archived group at the bottom.
Create a pipeline
- Select New pipeline, or Add pipeline to … next to a group. The same window as in the setup wizard opens.
- Who is it for? The company or one of your brands (only shown when you have brands).
- How do you want to start? A Dromix template, Blank (just New, Won and Lost), or Copy a pipeline.
- Enter a Name, for example Enterprise sales, and select Create pipeline.
The new pipeline gets its own copy of the stages, rules, messages and lost reasons. A copy takes them from the pipeline you copy. It starts in Test mode.
The Education template
The Education template follows a student from the first inquiry to enrolment. Its stages are Inquiry, Consultation, Programme offer sent, Application, Enrolment contract sent, Enrolled and Not enrolled. Its rules are on the Automations tab and its messages on the Messages tab, and you can change both.
- Inquiry and Consultation: a welcome email and an email with the booking link. Students who wrote on WhatsApp, Instagram or Facebook get a short chat message instead, so nobody gets both.
- Programme offer sent: Dromix prepares the offer draft and reminds the owner when it has not been answered after 3 days. When the student accepts the offer, the deal moves to Application, not straight to the contract.
- Application: the student gets an email asking for the application documents: ID card or passport, previous diploma, transcript and photo. The email lists the documents from the Documents tab and has an Upload your documents button that opens the student's upload page; replying with the documents attached also works. Chat students get the same list as a chat message. Until every required document is received, a reminder email goes out after 5 days and again after 10 days, listing the documents with the received ones ticked. After 15 days the owner gets a task to call. A reply or a partial upload does not stop the reminders; receiving every required document or moving the deal on does. The owner also gets the task Check documents / agree terms. When the student asked for changes to the offer, the task shows their request.
- When every required document is uploaded, the owner gets the task Review the uploaded documents. Move the deal to Enrolment contract sent yourself, or turn on the rule that does it on the Automations tab. Dromix prepares the contract draft from the accepted offer and reminds the student to sign it.
- Enrolled: a welcome email, the student becomes an active customer, and Dromix prepares the first invoice as a draft. Invoices are never sent automatically.
- Not enrolled: a friendly goodbye email that keeps the door open, and a task after 180 days to try again.
The template changes only new pipelines. Pipelines you already have keep their rules. To add the new rules to one of them, use Add from templates on the Automations tab.
Edit the stages
For each stage you set:
- Label: the name people see on the board, for example Proposal sent.
- Key: a short technical name, filled in for you.
- Won or Lost: tick one for the stages that end a deal.
Each stage also shows how many deals it holds and its win probability, for example 25%. Reports use the win probability for the forecast. You change it with Edit on the stage (Win %), where you can also choose the stage's Sales step (Sales flow). A stage with rules shows ⚡ 2 rules; select it to open them on the Automations tab.
Use the arrows to change the order, Add stage for a new one and Remove to delete one. A stage that still has deals cannot be removed. Select Save stages when you are done. To change one stage, select Edit on its row; one row is edited at a time.
Keep stages few and clear. Five to seven stages are enough for most teams.
Default, archive and delete
Open the pipeline and select ⋯ at the top:
- Set default: new deals go to this pipeline unless someone picks another. Your company and each brand have one default pipeline each, so setting a default only replaces the current default of the same brand. A brand's default is preselected when a lead of that brand is converted. The current default shows Default.
- Archive: hides the pipeline from boards and pickers but keeps its deals and history. Archived pipelines are in the Archived group; open one and select Restore in ⋯ to bring it back. To archive the default, choose another default pipeline first.
- Delete permanently: only for a pipeline without data: no deals (archived, won and lost too), leads, proposals, contracts, invoices, meetings, booking links or automation runs. Otherwise Dromix lists what it has (for example "12 deals, 3 proposals"); remove that data first, or archive the pipeline. Its stages, rules, messages and lost reasons are deleted with it, and lead forms that opened deals there send new leads to the Leads list. It is recorded in the audit log.
- Rename and Change brand open the General tab.
Export and import a pipeline
Use this to reuse a pipeline's setup on another Dromix, for example from a test install to the live one.
Export: on the pipelines page select Export and choose a pipeline, or open the pipeline and select ⋯ → Export to file. A JSON file downloads. It holds the name, stages, messages, automations and lost reasons. It does not hold deals, contacts, history, people, inboxes, webhooks, brands or WhatsApp template choices.
Import:
- On the pipelines page select Import and choose the file. Dromix checks it and shows what it contains.
- Choose the owner (the company or a brand; only shown when you have brands) and select Import pipeline.
- The summary shows what was created and what you still have to choose, for example "2 automation steps need a person chosen" or "1 WhatsApp message: choose its template again".
An import always creates a new pipeline; nothing that exists is changed. If the name is taken, " (imported)" is added. The pipeline starts in Test mode and every automation is off. Automations that pointed at a person, tag, webhook or custom field this Dromix does not have show Needs setup: open each one, choose what is missing and save, then switch it on. Until then those steps are skipped.
Only owners and admins can export and import. Both are recorded in the audit log. Dromix refuses files from a newer Dromix version, damaged or hand-edited files, and files over 1 MB.
Sending inbox
Customer emails of a pipeline go out from one team inbox, chosen in this order:
- The pipeline's own Sending inbox, if you set one. This is optional.
- Otherwise the team inbox of the pipeline's brand.
- Otherwise, for pipelines of the company, the company main inbox.
You link the main inbox and the brand inboxes in Inboxes & channels in the setup wizard. To give one pipeline a different inbox, open it and choose an inbox under Sending inbox on the General or Messages tab. Dromix saves it right away and shows the sender as customers see it, for example Elite <hello@elite.com>. The sender name is the brand's name, or your company name for company pipelines.
The sending inbox does three things:
- Emails sent by rules of this pipeline go out from it, signed with the deal owner's email signature. A deal without an owner is signed with the brand's name, or your company name for company pipelines.
- Replies to those emails are filed on the deal they were sent for, even when the deal is already won or the customer has other open deals.
- New email leads that arrive at a pipeline's own inbox have this pipeline preselected under Pipeline for convert. Leads at a brand inbox suggest the brand's default pipeline, and leads at the main inbox the default company pipeline. The lead also gets the inbox's brand.
| Rule | What you see |
|---|---|
| Only team inboxes can be chosen | Personal mailboxes are not in the list. |
| Each inbox belongs to one owner | The company, one brand or one pipeline. An inbox used elsewhere shows (used by …) and cannot be picked. |
| No limit on pipelines | Your plan limits the number of brands (Starter 1, Business 3, Enterprise 10), not pipelines or inboxes. |
A brand pipeline without a sending inbox does not send its customer emails, and Dromix never sends them from the system email instead. A company pipeline without a main inbox skips the emails its rules send; proposals, contracts and meeting invites then come from the system email. The deal timeline shows why an email was not sent. WhatsApp, Instagram and Facebook messages are not affected.
When the inbox has a connection problem, a red note appears under the picker. Fix the inbox in Integrations → Email. If someone removes the team inbox, the link is cleared and the pipeline shows the warning again.
Brands and Test mode
Each pipeline belongs to the company (the main brand) or to one brand from the setup wizard. Change it under Brand on the General tab. All customer emails of a brand pipeline's deals, including proposals, contracts, signed copies, reminders, meeting invites, invoices and payment reminders, use the brand's name, logo and inbox. Internal notifications always come from the system email.
New pipelines and copies start in Test mode: rules run, but their emails and chat messages to customers are held, so you can try the pipeline without writing to real customers. Select Go live at the top of the pipeline to end it. Back to Test mode (in ⋯) is only available while the pipeline has no deals.
Documents & booking defaults
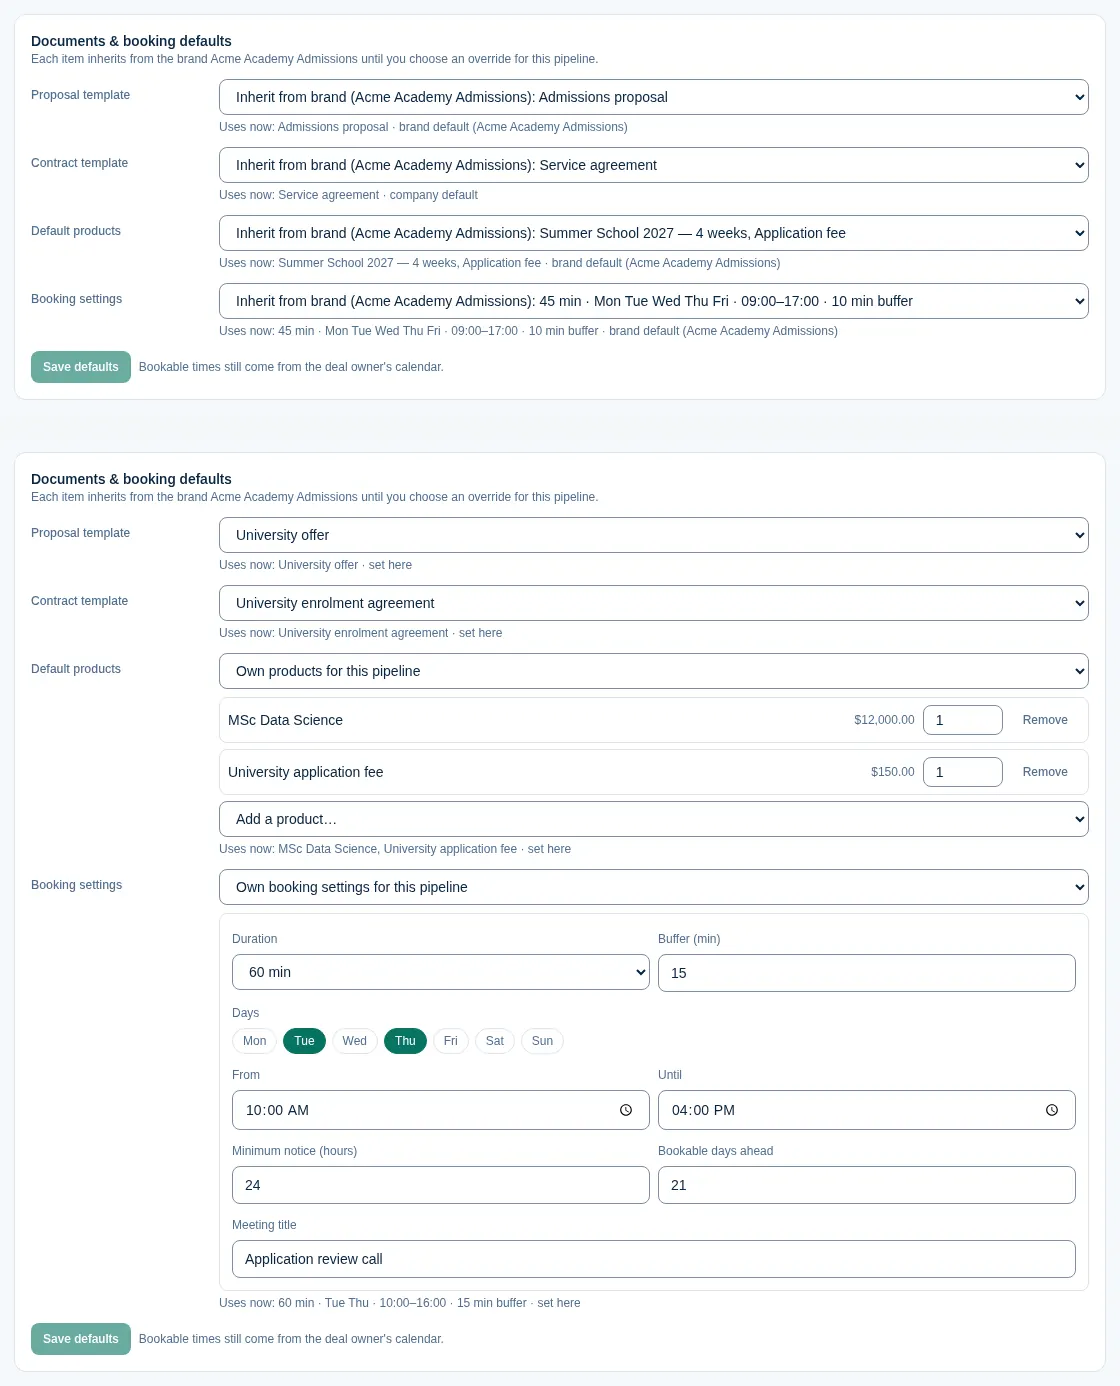
On the General tab, Documents & booking defaults sets four things for the pipeline's deals. Each one shows Inherit from brand (<brand name>) (on company pipelines Inherit from company (<company name>)) together with what that gives today, and an optional override for this pipeline only:
- Proposal template and Contract template: the template chosen first when someone creates a proposal or contract on a deal of this pipeline.
- Default products: pre-filled on new proposals. Choose Own products for this pipeline to pick products and quantities; an empty list means no products.
- Booking settings: duration, buffer, days, hours, minimum notice, days ahead and meeting title of the booking page. Bookable times still come from the deal owner's calendar.
Under each item, Uses now says which value applies and where it comes from: set here, the brand default or the company default. The pipeline override wins, else the brand default, else the company default. Select Save defaults. Invoice settings belong to the brand and have no pipeline override.
For example, at Acme Academy the pipeline Summer School inherits everything from its brand, while University Applications uses its own proposal and contract templates, a University application fee product and 60-minute calls on Tuesdays and Thursdays.
Lead sources & assignment
The Lead sources & assignment tab shows where this pipeline's leads come from and who gets them:
- At the top, Lands here lists the sources whose new leads open in this pipeline, and Not routed here (goes to …) names the pipeline the other sources go to. On a brand pipeline only the brand's own sources are listed: for example, the forms of Acme Summer Camps land in its Default pipeline.
- Web forms lists the forms that open deals in this pipeline, and the forms marked Lead form whose leads land here: they create a lead first, and converting it opens the deal here.
- Booking page says whether customers can book a meeting. Hours are company-wide; times come from the deal owner's calendar.
- Assignment shows the rules. On a company pipeline these are the company rules, which apply to every pipeline unless a brand overrides a source. On a brand pipeline each source shows the brand's own rule or Uses company rules, with Override for this brand; see Rules per brand.
Rules and messages
The Automations tab holds the pipeline's rules: when something happens to a deal, if it matches, then Dromix does the steps, for example sends an email, creates a task or moves the deal. The Messages tab holds the emails and chat messages that rules send.
Emails go out from the pipeline's sending inbox and are signed with the deal owner's email signature, or with the brand's (or company's) name when the deal has no owner. On WhatsApp, after the 24-hour window, Dromix sends the approved template you chose, or skips the message.
Sales flow
For the 7-step sales process with proposals, contracts and invoices, give each stage its Sales step and add Dromix's ready rules with Add from templates on the Automations tab. Settings for all pipelines (booking page, discount approval, countersigning, onboarding) are in Sales flow & booking. See Sales flow and booking.